
The Ultimate 10-Point Client Onboarding Checklist for Vacation Rental Hosts
Streamline your process with our complete client onboarding checklist. Actionable steps to improve guest experience, save time, and earn 5-star reviews.

Disclosure: Some links in this article are affiliate links. If you make a purchase, we may earn a commission at no extra cost to you. This helps support our content.
Preparing for a new guest can feel like a mad scramble. We've definitely been there. Juggling properties from our own 4-bedroom house in Washington, D.C., to a few beach properties in the Riviera Maya, we learned that a smooth, repeatable process isn't just a 'nice-to-have'. It's the foundation of a rental business that can grow without chaos. It’s what turns a first-time guest into a repeat booker and a stressed host into a confident one.
A structured process is the single best tool for eliminating mistakes, reducing those endless back-and-forth questions, and ensuring every guest feels welcomed and cared for from the moment they book. This isn't about rigid rules; it's about creating a reliable framework for a five-star experience every single time. A solid onboarding process is also the first step toward building lasting relationships and implementing effective customer engagement strategies that drive growth.
While every host has their own way of doing things, we've spent over a decade refining a system that delivers consistency and saves us countless hours. This article breaks down our comprehensive, 10-step client onboarding checklist designed to help you create a seamless system for your own properties. From initial account setup and brand customization to activating AI-powered support and integrating guest feedback, each step is an actionable building block toward a calmer, more profitable hosting operation. Let's dive in.
1. Account Creation and Property Setup
The very first step in any effective client onboarding checklist is creating a solid foundation. This is where you establish your digital headquarters by setting up your SmoothStay account and meticulously inputting the details of each property. Think of this as laying the groundwork for your entire guest management system. A rushed or incomplete setup here can cause headaches later, from incorrect automated messages to confused guests.
This initial process involves registering with your email, setting up secure authentication, and then methodically entering core property information. This includes the basics like the property address, type (e.g., condo, house), and the number of bedrooms and bathrooms. More importantly, it also includes the granular details that guests need, such as a comprehensive list of amenities, Wi-Fi network information, and specific house rules. Getting this right from the start ensures that all subsequent features, like your digital guidebook and automated communications, pull from an accurate and complete source of truth.
Why This Is a Critical First Step
Proper account and property setup is non-negotiable because it directly impacts operational efficiency and guest satisfaction. A detailed and accurate property profile allows you to automate information delivery, reducing the time you spend answering repetitive questions. For guests, it demonstrates professionalism and care, setting a positive tone for their stay before they even arrive.
Actionable Tips for a Flawless Setup:
Gather Everything First: Before you even log in, compile all necessary information in a separate document. This includes the full address, Wi-Fi name and password, check-in/out instructions, a complete list of amenities, and your house rules. Having it all ready makes the process much faster.
Use Consistent Naming: If you manage multiple properties, establish a clear naming convention (e.g., "Riviera Maya - Tulum Condo" or "DC - Capitol Hill House"). This simple habit makes navigating your dashboard and managing properties significantly easier as you grow.
Upload High-Quality Photos: Your property profile isn’t just for internal use. High-quality photos enhance the professional look of your digital guidebook and reinforce the guest's booking decision, building trust and excitement.
Batch Your Work: For hosts with multiple properties, we’ve found it’s most efficient to set aside a block of time to add them all at once. This helps maintain consistency in the level of detail and tone across all your listings.
2. Brand Customization and White-Label Configuration
Once your properties are set up, the next step in a professional client onboarding checklist is to infuse your brand's unique identity into the guest experience. This is where you transform generic guest communications into a polished, white-labeled interface. By customizing your digital guidebook and other materials with your logo, brand colors, and a custom domain, you create a seamless and memorable impression. This step elevates your operation from just another rental to a distinct, professional hospitality brand.
This process involves uploading high-resolution brand assets and selecting a color palette that reflects your property's style or your company's identity. For example, a luxury rental might use elegant gold and navy accents, while a vibrant beach house could use teals and corals. Setting up a custom URL (like guidebook.yourbrand.com) further reinforces this professional image, ensuring every guest touchpoint feels cohesive and intentionally designed, building trust from the moment they access their information.
Why This Is a Critical Step
Brand customization is essential for establishing credibility and differentiating your properties in a crowded market. When guests interact with a beautifully branded guidebook, it immediately signals a higher level of care and professionalism. This white-label approach removes third-party branding, like SmoothStay's, and puts your brand front and center, strengthening guest loyalty and encouraging direct bookings in the future.
Actionable Tips for a Flawless Setup:
Align Colors with Your Vibe: Select a primary and secondary color for your guidebook that complements your property's interior design or your brand's existing color scheme. This creates a harmonious visual experience for the guest.
Use a High-Resolution Logo: Ensure your logo is a high-quality file to prevent it from looking pixelated or blurry on different devices. A crisp logo is a small detail that makes a big impact.
Create a Memorable Custom URL: Instead of a generic link, set up a custom subdomain like
welcome.thebeachhouse.comorguide.mountainviewcabin.com. It’s easier for guests to remember and looks far more professional.Test Across Devices: Before sending the guidebook link to guests, preview it on a phone, tablet, and desktop computer. This quick check ensures your branding looks great and functions perfectly on every screen size.
3. Check-In Instructions and Access Information Setup
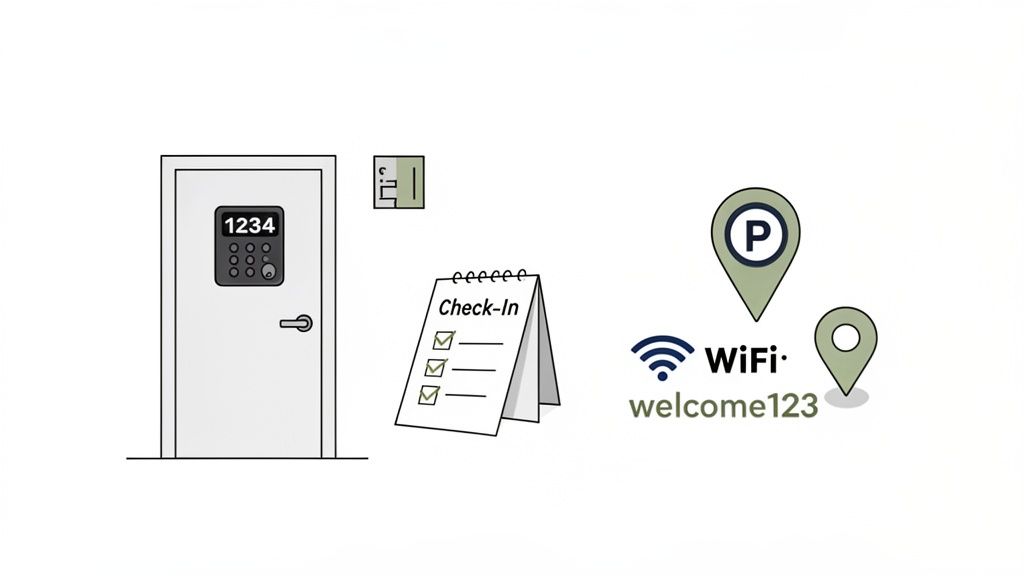
Once the core property details are in place, the next crucial piece of your client onboarding checklist is to configure flawless check-in instructions. This is where you proactively answer every possible question a guest might have about arriving, from finding the property to getting through the door. A seamless arrival experience sets the tone for the entire stay and is one of the most powerful ways to earn a five-star review before a guest even unpacks.
This process involves meticulously documenting everything a guest needs to know for a smooth arrival. This includes specific door codes, lockbox locations, detailed parking directions, and Wi-Fi credentials. For properties we manage in bustling urban areas like Washington, D.C., this also means providing tips on navigating the area and finding the best street parking. Conversely, for our more remote Riviera Maya properties, we provide precise GPS coordinates and instructions for any gate access. Getting this right prevents late-night calls and anxious messages, freeing up your time and delighting your guests.
Why This Is a Critical Step
Detailed and clear check-in information is non-negotiable because it directly prevents guest stress and reduces your support workload. When guests feel confident about their arrival, they start their vacation on a positive note. For hosts, this step is a massive time-saver; based on our experience, well-documented instructions can eliminate a huge number of repetitive check-in day questions. This is a key part of any scalable operation. For a deeper dive into crafting the perfect guest resource, explore our guide to creating a comprehensive digital welcome book for your Airbnb.
Actionable Tips for a Flawless Setup:
Think Like a Guest: Write your instructions as if you're arriving at the property for the first time, late at night, and in the rain. What information would you absolutely need? Cover every potential point of confusion, from which gate to use to how the smart lock beeps.
Use Visual Aids: A picture or a short video is worth a thousand words. Include photos of the parking space, the front door, the lockbox, or any other key visual cue. A quick video showing how to operate the lock can be a game-changer.
Provide a Backup Plan: Technology can fail. Always include an alternative check-in method or a reliable emergency contact number. This gives guests peace of mind and provides a failsafe for everyone.
Test Your Instructions: The single best way to ensure clarity is to walk through the process yourself, following only the instructions you’ve written. Or, ask a friend who has never been to the property to test them and provide feedback.
4. Local Recommendations and Amenity Information
Once the foundational property details are in place, the next crucial step in your client onboarding checklist is to enrich the guest experience with curated local knowledge. This involves compiling and organizing thoughtful recommendations for restaurants, attractions, and local services. You are not just providing a place to stay; you are offering a key to the city. This transforms a standard digital guidebook into a personalized local concierge service, a touch that guests remember and appreciate.
This process goes beyond simply listing a few nearby coffee shops. It’s about creating a resource that anticipates guest needs and sparks excitement for their trip. Think about what makes your location unique: Is it the hidden hiking trails, the best restaurants for a sunset view, or the family-run vineyard just down the road? Compiling this information, along with practical amenity details like how to operate the smart TV or coffee maker, creates a comprehensive and invaluable guide that elevates their entire stay.
Why This Is a Critical Step
Curating local recommendations and detailed amenity information directly translates to five-star reviews and repeat bookings. It shows guests you've gone the extra mile, saving them hours of research and helping them discover authentic local experiences. For hosts, it preemptively answers dozens of common questions, drastically reducing repetitive communication and freeing up your time to focus on other aspects of your business. This is where you transition from being just a host to a trusted local expert.
Actionable Tips for a Flawless Setup:
Be the Local Expert: Personally vet your recommendations. Visit the restaurants, walk the trails, and talk to local business owners. A recommendation based on real experience is far more valuable than a generic list pulled from the internet.
Organize for Different Guests: Structure your recommendations into categories that serve various guest types. We’ve found that creating lists like "Date Night Dinners," "Family-Friendly Activities," and "Rainy Day Ideas" helps guests quickly find what’s relevant to them.
Include Insider Details: Add the small tips that make a big difference. Mention the best time to visit an attraction to avoid crowds, which local market has the freshest produce, or the secret to getting a reservation at a popular spot. These insights demonstrate genuine care.
Keep It Fresh: Local scenes change. Set a reminder to review and update your recommendations quarterly. Add seasonal suggestions, like local holiday markets in the winter or the best beaches in the summer, to keep your guidebook current and useful.
5. Appliance and Property Tutorial Integration
Once your property is set up and your communications are automated, the next crucial step is to anticipate and address guest questions before they even arise. This is where you integrate comprehensive tutorials for appliances and property-specific features. Think of it as creating a digital user manual for your home, covering everything from the smart TV and espresso machine to the hot tub controls and security system. A guest arriving late at night shouldn't have to struggle with an unfamiliar thermostat or a complex coffee maker.
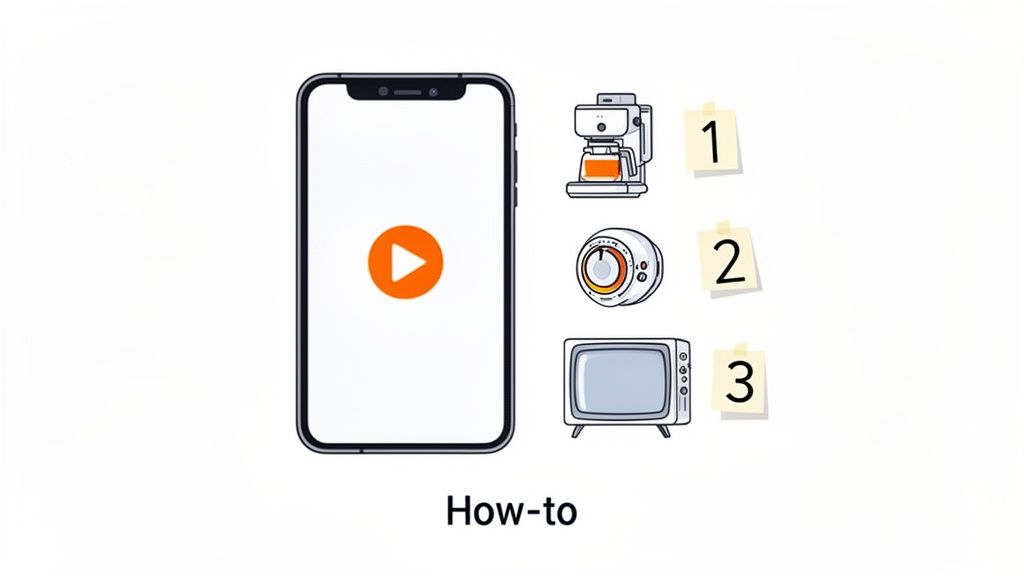
This process involves creating short, easy-to-digest video guides, step-by-step written instructions, and quick troubleshooting tips. For our beachfront properties, tutorials on the pool heater and saltwater shower system have dramatically reduced late-night calls. Similarly, a quick video on using the smart lock can prevent access issues and guest frustration right at the start of their stay. This proactive approach is a cornerstone of a smooth client onboarding checklist, demonstrating thoughtful hospitality that sets you apart.
Why This Is a Critical Step
Integrating tutorials is non-negotiable because it empowers guests, reduces your workload, and protects your property. When guests feel confident using your amenities, their overall satisfaction skyrockets. It also minimizes the risk of damage from improper use and frees you from answering the same questions repeatedly. This small investment of time upfront pays significant dividends in positive reviews and operational peace of mind.
Actionable Tips for Flawless Integration:
Create Short, Focused Videos: Keep each tutorial under two minutes. Film from the guest's perspective, clearly showing which buttons to press and what to expect. A quick guide on the wine cooler is far more effective than a long, rambling video.
Organize by Room: Structure your tutorials logically within your digital guidebook. Group all kitchen appliance videos together, entertainment system guides in the living room section, and so on. This makes information easy for guests to find when they need it.
Include Troubleshooting: For every tutorial, add a "Common Issues" or "What to Do If..." section. For a Wi-Fi guide, include simple steps for resetting the router. This empowers guests to solve minor problems on their own.
Add Captions and Text: Always include captions or text overlays on your videos. This makes them accessible for everyone and allows guests to watch them without sound, which is often more convenient.
6. QR Code Generation and Mobile Optimization
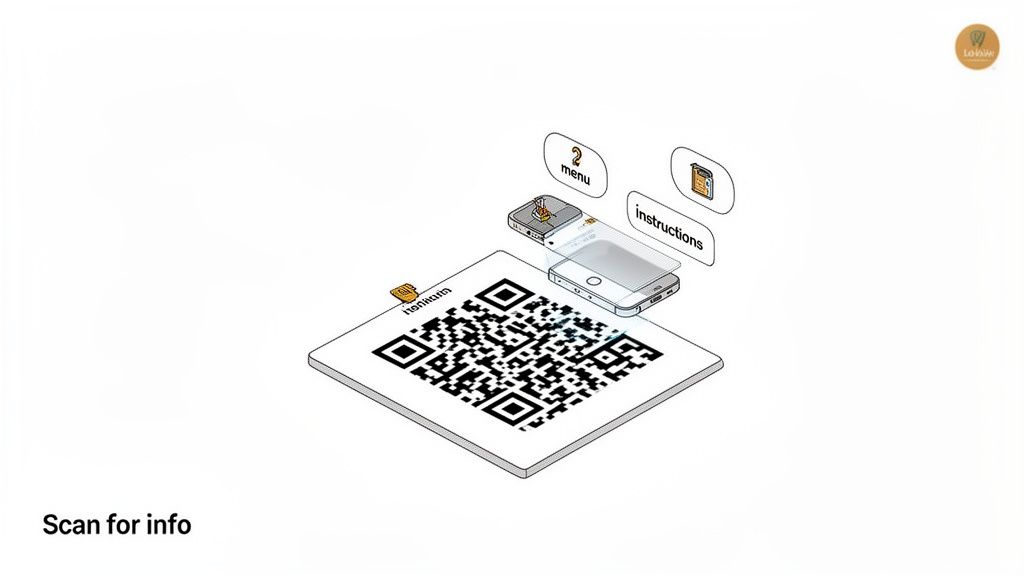
Once your digital guidebook is complete, the next step is to make it effortlessly accessible to your guests right where they need it. This involves generating scannable QR codes that provide instant access to specific guidebook content and ensuring the entire guide is optimized for a seamless mobile experience. Instead of a guest fumbling to find a binder or searching through emails, a simple scan with their phone can pull up appliance instructions or Wi-Fi details on the spot.
This process bridges the gap between your physical property and your digital resources. By placing QR codes strategically throughout the home, you empower guests with immediate, context-specific information. This not only enhances their experience by removing friction but also positions you as a tech-savvy and thoughtful host. A well-executed mobile experience is a crucial part of a modern client onboarding checklist, reflecting a high standard of professionalism.
Why This Is a Critical Step
Integrating QR codes and prioritizing mobile optimization is essential because it meets modern guest expectations for convenience and instant access. A guest trying to figure out the coffee machine at 7 AM doesn't want to search their inbox for a PDF. They want to point their phone at the machine and get instructions. This proactive approach significantly reduces support questions and prevents small frustrations from becoming negative review points, directly impacting guest satisfaction and operational workload.
Actionable Tips for a Flawless Setup:
Be Strategic with Placement: Don't just place one QR code at the entrance. Put specific codes where they are most relevant: next to the smart TV linking to streaming service logins, on the washer/dryer with usage instructions, and near the hot tub with safety rules.
Link to Specific Sections: Avoid linking every QR code to the guidebook's homepage. A code on the microwave should link directly to the microwave instructions. This targeted approach saves your guests time and makes the feature genuinely useful.
Test Extensively: Before printing and placing your codes, test them with multiple phone models (iPhone and Android) and different QR scanner apps. Ensure they scan quickly and reliably. Also, print a backup URL near the code just in case a guest's phone has trouble scanning.
Use Durable Materials: For QR codes in high-moisture areas like bathrooms, kitchens, or outdoor spaces, print them on laminated or waterproof material to ensure they last. For more details on implementation, explore how a QR code check-in system can streamline guest arrivals.
7. Multi-Language Translation and International Guest Support
To truly elevate the guest experience and broaden your market reach, making your property accessible to international travelers is a game-changer. This step involves translating key guest communications, especially your digital guidebook, into multiple languages. By removing language barriers, you ensure that every guest, regardless of their native tongue, can easily understand critical information like check-in instructions, house rules, and emergency procedures.
This process goes beyond simple translation; it's about creating a welcoming and inclusive environment. When guests from other countries see information presented in their own language, it immediately builds trust and signals a high level of care and professionalism. From a practical standpoint, it dramatically reduces misunderstandings, minimizes questions, and prevents common issues that arise from miscommunication, making it a crucial part of any comprehensive client onboarding checklist.
Why This Is a Critical Step for Growth
Offering multi-language support directly impacts guest satisfaction and your bottom line. It opens your property to a wider demographic of international travelers who might otherwise hesitate to book a stay where they anticipate a language barrier. For our properties in the Riviera Maya, providing Spanish and French translations has been instrumental in attracting European and South American guests, leading to higher occupancy rates outside of the typical North American tourist seasons.
Actionable Tips for a Flawless Setup:
Identify Your Key Languages: Analyze your past booking data or your region’s tourism statistics to identify the top 5-10 languages spoken by your international visitors. For our Playa del Carmen property, this meant prioritizing Spanish, French, German, and Portuguese.
Prioritize Safety First: Begin by translating the most critical information: emergency contacts, fire safety procedures, Wi-Fi details, and essential house rules. Using a professional human translator for these sections is a good idea to ensure 100% accuracy.
Use AI for Lighter Content: For less critical sections like local recommendations or appliance guides, AI-powered translation tools can be a cost-effective solution. If possible, it's always best to have a native speaker review it for cultural nuance.
Make Language Selection Obvious: Ensure your digital guidebook has a prominent language selector, perhaps using flags, right at the top. This makes it effortless for guests to switch to their preferred language upon arrival.
8. AI Chatbot Activation and Configuration
The next crucial piece of your client onboarding checklist is leveraging automation to deliver instant, 24/7 support. This is where you activate and configure an AI chatbot, a powerful tool that answers guest questions automatically. The chatbot is trained on your digital guidebook content and can instantly respond to common inquiries about check-in times, Wi-Fi passwords, amenity locations, and even local recommendations.
Think of the chatbot as your virtual front-desk agent, always available and ready to help. For example, when a guest messages at 2 AM asking how to use the coffee machine, the chatbot provides an immediate, helpful answer instead of waking you up. This AI-powered support can handle a majority of routine guest questions, freeing you to focus on more complex issues and providing a superior, modern guest experience.
Why This Is a Critical Step
Activating an AI chatbot is a smart move for hosts looking to scale efficiently while maintaining high service standards. It provides immediate gratification for guests, who receive answers in seconds rather than hours. For you, it means fewer repetitive interruptions, reduced support costs, and more time to manage your business. It's a key part of building a resilient, self-sufficient guest communication system that works for you around the clock.
Actionable Tips for a Flawless Setup:
Train with a Solid Foundation: Your chatbot is only as smart as the information you give it. Before activation, ensure your digital guidebook is comprehensive and accurate. The chatbot pulls answers directly from this source, so a detailed guidebook is the first step to a helpful bot.
Test Extensively: Before letting the chatbot interact with guests, run multiple test scenarios. Ask common questions, try phrasing them differently, and see how it responds. This helps you identify and fill any knowledge gaps.
Define Escalation Paths: Determine exactly when and how the chatbot should hand a conversation over to a human. Configure clear rules for sensitive issues, guest complaints, or any question it cannot answer, ensuring a seamless transition.
Monitor and Refine: Regularly review chatbot conversation logs. This is one of the most valuable parts of your client onboarding checklist for long-term improvement. Look for unanswered questions or patterns that indicate you need to add more information to your guidebook, which in turn improves the chatbot's performance. For more strategies, you can learn more about optimizing a vacation rental chatbot.
9. Booking Link Integration and Time-Based Access Setup
The booking link integration and time-based access setup is where you tie each guest’s guidebook and check-in instructions directly to their reservation. By sending a unique link that only activates for specific dates, you ensure guests see exactly what they need, when they need it, without manual follow-up. This step is a must-have in any client onboarding checklist for vacation rentals aiming to deliver a polished, personalized experience.
Using automation features, you can schedule link activation a week or two before check-in and extend access a couple of days after checkout. This guarantees that parking rules, quiet hours, or weather-specific packing tips appear at just the right time. For hosts in beach destinations like our Playa del Carmen condo or city homes like our one in DC, this prevented confusion around shared amenities and seasonal guidelines.
Why This Is a Critical Step
Personalized timing reduces guest anxiety and lowers your support volume. From our own experience over a decade of hosting, this is what worked for us. Guests feel cared for when they receive only relevant details, and hosts avoid sending generic PDFs or chasing down confirmations.
Link integration also safeguards your operations. Time-based controls prevent early peekers from discovering unfinalized instructions, cut off latecomers from booking-only perks, and keep your onboarding process consistent across different platforms.
Actionable Tips for a Flawless Setup
Trigger links immediately after booking confirmation to give guests maximum prep time
Set pre-arrival windows 7–14 days out for packing lists, parking codes, and house rules
Configure post-checkout access (e.g., 48 hours) for lost keys or late questions
Test across platforms like Airbnb, VRBO, and direct bookings to ensure compatibility
Include links in automated confirmation emails via your guest comms tool or PMS
Offer backups such as emailed URLs or QR codes for guests who misplace access
Monitor link opens to spot tech issues and reach out proactively
Consider extended access for repeat guests or special requests
Implementing this integration means every guest feels guided and hosts can scale operations with confidence.
10. Guest Feedback, Reviews, and Analytics Dashboard
The final, crucial step in your client onboarding checklist is creating a closed loop of improvement. This involves setting up systems to collect guest feedback, encourage public reviews, and analyze performance data through a centralized dashboard. Think of this as your property's report card and strategic planning tool, all in one. It’s not just about reacting to issues; it's about proactively understanding guest behavior to enhance future stays and boost your bottom line.
This process involves configuring automated post-stay messages that request private feedback and public reviews, as well as setting up your analytics dashboard. By connecting guest interactions within your digital guidebook to the feedback they provide, you can uncover powerful insights. For instance, you might find that guests who view the appliance tutorial videos are more likely to leave a 5-star review, proving the value of that content. This transforms guest data from a simple satisfaction score into an actionable roadmap for improvement.
Why This Is a Critical Final Step
A robust feedback and analytics system is non-negotiable for sustainable growth. It provides the qualitative and quantitative data needed to refine your operations, justify investments, and market your property more effectively. For hosts looking to gather actionable insights, exploring modern strategies to collect customer feedback effectively is a game-changer. It helps you identify your biggest strengths to highlight in listings and pinpoints weaknesses before they tarnish your reputation, making it an essential part of any professional management workflow.
Actionable Tips for a Flawless Setup:
Keep Feedback Surveys Brief: To maximize completion rates, limit your internal survey to 3-5 essential questions. Start with a simple rating scale question, then ask for specific feedback on what guests loved and what could be improved.
Time Your Requests Strategically: Send a mid-stay check-in message for longer bookings to catch issues early. Schedule the primary feedback and review requests to go out shortly after checkout while the experience is still fresh in the guest's mind.
Separate Feedback from Reviews: Ask for private feedback first. In a separate, subsequent message, ask for a public review. This two-step process often leads to more thoughtful internal feedback and a higher rate of positive public reviews.
Focus on Actionable Metrics: In your analytics dashboard, prioritize engagement rates over vanity metrics like total views. Track which pages of your guidebook are most popular and which are ignored to understand what truly matters to your guests.
10-Point Client Onboarding Checklist Comparison
Item | 🔄 Implementation Complexity | ⚡ Resource Requirements | ⭐ Expected Outcomes | 📊 Ideal Use Cases | 💡 Key Advantages |
|---|---|---|---|---|---|
Account Creation and Property Setup | 🔄 Low — straightforward registration and property data entry | ⚡ Minimal — time for info and photos; scales with portfolio | ⭐ Establishes core account & property structure enabling features | 📊 New hosts, small portfolios, trial onboarding | 💡 Quick start, free starter plan, one-click cloning for multiples |
Brand Customization and White-Label Configuration | 🔄 Low–Medium — UI choices, domain and visual setup | ⚡ Low — assets (logo, colors) and time to finalize aesthetics | ⭐ Professional branded guest experience; higher perceived value | 📊 Luxury rentals, boutique hotels, Superhosts | 💡 Differentiates property, removable branding, no coding needed |
Check-In Instructions and Access Information Setup | 🔄 Medium — requires precise, organized step-by-step content | ⚡ Moderate — time to write, photos/videos, and maintain codes | ⭐ Dramatic reduction in check-in inquiries; smoother arrivals | 📊 Properties with complex access (urban locks, rural gates) | 💡 Use photos/QRs, test instructions, keep emergency info prominent |
Local Recommendations and Amenity Information | 🔄 Medium–High — research, curation, and periodic updates | ⚡ Moderate–High — ongoing verification and local knowledge | ⭐ Enhanced guest experience and higher review likelihood | 📊 Destination-focused rentals, B&Bs, concierge-style stays | 💡 Curate by guest type, update seasonally, include booking links |
Appliance and Property Tutorial Integration | 🔄 High — video production and technical documentation | ⚡ High — filming, hosting, possible outsourcing | ⭐ Fewer misuse incidents, lower maintenance costs, happier guests | 📊 Properties with premium/smart appliances or complex systems | 💡 Short how‑tos (<2min), captions, keep tutorials up to date |
QR Code Generation and Mobile Optimization | 🔄 Low–Medium — design, placement planning and testing | ⚡ Low — printable assets and mobile testing | ⭐ Instant access for guests; reduces friction and searches | 📊 High mobile-use properties; rooms with appliance tutorials | 💡 Place QR near relevant items, print >2x2", include backup URL |
Multi-Language Translation and International Support | 🔄 Medium — AI setup plus human review for critical content | ⚡ Moderate — AI costs + selective professional translation | ⭐ Broader market reach and improved safety/guest satisfaction | 📊 International destinations, multilingual cities, resorts | 💡 Prioritize top languages, translate safety info first, test natively |
AI Chatbot Activation and Configuration | 🔄 Medium–High — training, escalation rules, and testing | ⚡ Moderate — initial setup and ongoing monitoring | ⭐ 24/7 automated support; can handle ~80% routine questions | 📊 High-volume hosts, multilingual properties, 24/7 service needs | 💡 Train on complete guidebook, set clear escalation to humans |
Booking Link Integration and Time-Based Access Setup | 🔄 High — booking platform integrations and time rules | ⚡ Moderate–High — technical setup and cross-platform testing | ⭐ Personalized, secure access; prevents premature info sharing | 📊 Properties with time-sensitive access or shared amenities | 💡 Send links on confirmation, set pre-arrival windows, test integrations |
Guest Feedback, Reviews, and Analytics Dashboard | 🔄 Medium–High — survey setup, analytics configuration | ⚡ Moderate — survey design, data review, incentives | ⭐ Actionable insights; increases review quantity/quality and ROI | 📊 Portfolio managers, hosts focused on iterative improvement | 💡 Keep surveys short, track engagement-to-review correlation, act on trends |
Your Turn: Start Building a Better Guest Experience Today
We've covered a lot of ground, breaking down the essential steps to create a seamless and professional client onboarding checklist. From the initial account creation and brand customization to the finer points of AI chatbot configuration and multi-language support, each element plays a vital role in shaping your guest's first impression and overall experience. Thinking back on our own journey, from managing our house in Washington, DC to our beach properties in Mexico, we know how overwhelming it can feel. The goal isn't to implement every single one of these ten steps overnight.
The real takeaway is that a structured onboarding process is not just an administrative task; it is the very foundation of five-star hospitality. It’s your first and best opportunity to communicate professionalism, build trust, and set the stage for a stress-free stay. By proactively addressing guest needs before they even have to ask, you transform their experience from merely transactional to truly memorable. This proactive approach is what separates good hosts from great ones.
Turning Your Checklist into a Competitive Advantage
Your client onboarding checklist is more than a list of to-dos; it is a strategic asset. Each step you automate and refine frees up your most valuable resource: time. Instead of repeatedly answering questions about the Wi-Fi password or how the coffee maker works, you can focus on scaling your business, optimizing your listings, or simply enjoying the rewards of your hard work. A well-executed checklist directly impacts your bottom line by:
Reducing Repetitive Workload: Answering fewer questions means more time for high-impact activities.
Boosting Positive Reviews: Guests who feel informed and cared for are far more likely to leave glowing reviews.
Encouraging Direct Bookings: A professional, branded experience builds loyalty and encourages guests to book directly with you for their next trip.
Think of each item on this list as a building block. Start with the most critical pieces for your operation. For most hosts, this means nailing the Check-In Instructions (Step 3) and curating a solid list of Local Recommendations (Step 4). Once those are perfected, move on to integrating appliance tutorials or activating an AI chatbot to handle late-night inquiries. The key is consistent, incremental improvement.
Your Actionable Next Steps
Don't let this comprehensive guide become just another open tab in your browser. The path to a better guest experience starts with a single step. Here’s what you can do right now:
Identify Your Biggest Pain Point: Which guest question do you answer most frequently? Is it about parking, the smart lock, or where to find the best local tacos? Start by building out that specific section of your onboarding.
Choose One Process to Automate: Pick one task from the checklist that you currently handle manually. This could be sending check-in details or reminding guests about check-out procedures.
Download and Customize: Use our provided templates as your starting point. You don't need to reinvent the wheel. Adapt the structure to fit your unique property and hosting style.
Remember, the goal of a robust client onboarding checklist is to create a system that works for you, so you can deliver an exceptional experience that feels personal and effortless to your guests. Every small improvement you make adds up, creating a powerful, positive loop of happy guests, stellar reviews, and a thriving rental business. You've got this.
Ready to turn this checklist into a reality with a tool built by hosts, for hosts? SmoothStay centralizes every step we've discussed, from customizable, professional guidebooks and AI-powered guest support to automated messaging, all in one intuitive platform. Start your free trial today and see how simple it is to deliver a five-star guest experience, every single time.

